
This set came with BROKEN TUBE see here:
but I have an exact same type of CRT tubePHILIPS A 59-23 W (A59-23W)


Then I opened the set

and started to dismount the front to reach the screws of the tube cabinet mounting system which is located frontly under the front plastic itself.
After i was in place to leave out the screws to get out the broken tube.


Here the broken tube is out of the cabinet. Note the internal and the deflection joke awaiting another tube to be "deflected" !!

"NEW" CRT Tube fitted in the set awaiting the placing over of the front.

After i was in place to leave out the screws to get out the broken tube.


Here the broken tube is out of the cabinet. Note the internal and the deflection joke awaiting another tube to be "deflected" !!

"NEW" CRT Tube fitted in the set awaiting the placing over of the front.

.............. It was relatively ...............easy................
Replacing A CRT Tube:
HAVING decided that a new tube is necessary, we have to face up to the sometimes tedious task of fitting it in the set. There are normally few problems, but on occasions the unexpected happens and a straightforward job then becomes a test of nerves and patience - how that lead become disconnected (when you find it) you'll never know. We're concerned here with tube changing rather than fault finding however, so we'll confine ourselves to routine matters and hope that the unexpected doesn't happen to you.
Dismantling the Set The first thing to check is the type of tube fitted in the set - there are some odd ones around, mainly in the less common sets, and this can be confusing when the label is missing.
Next survey the, cabinet, noting any obstructions that will be left to impede tube removal once the chassis has been withdrawn. This applies particularly to those sets with a vertical main panel, such as some types series, where there are top and bottom obstructions. It's sometimes easier to remove the fixing screws of any such mountings before withdrawing the chassis, so that they all come out together.
Then remove the tube base socket and slacken the clamp of the blue lateral magnet (in case of delta gu crt tubes), which is mounted immediately behind the purity rings - we're assuming that the tube is of the older delta -gun type rather than the in -line gun type (PIL, 20AX, 30AX etc.).
Depending on their type, the scanning and convergence assemblies can either be removed together or separately.
Also the clamp screw may not be in an obvious position. It's normally recessed between the two units, on the right- hand side. If these assemblies have easily reached plug and socket connections, it's sometimes better to disconnect them and leave the assemblies themselves on the tube neck until the chassis has been removed, rather than having the assemblies dangling around half way through the proceedings.
After you've removed the tube base and the blue lateral magnet, note the position of the purity rings before removing them: try not to disturb them too much, as this can sav
 e much time when the new tube is being fitted. If the work bench is wide enough, the chassis can be swung round at an angle so that the tube can be taken out without removing the tuner and the front controls. Note also the positions of the convergence and scan coils, so that they can be put back in near enough the same positions on the neck of the new tube. There are also connections to the degaussing coils: these may consist of a simple plug and socket, but in some chassis the leads extend back to the tube base socket, together with one or more earthing leads from the degaussing shield - you may find them screwed or soldered to the tube base. Carefully note each lead's position and tag.
 With more recent tubes there's no separate degaussing shield - the shield is within the tube, the degaussing coils being hung on the tube.
Before the chassis can be withdrawn it will also be necessary to remove the e.h.t. connector, which goes to the top or bottom of the bowl depending on which way up the tube is mounted. Note that in some cases this contact can hold a charge for a considerable period. It's prudent therefore to touch the clip to chassis after disconnecting it, and to discharge the tube's connector to the degaussing shield - this is in contact with the tube's outer coating - using a convenient lead or screwdriver blade.
Tube Removal With all the leads off, check how the degaussing shield is held in place. This is sometimes done by means of screws or nuts at the four corners, sometimes by means of springs. If nuts are used, remove one of the lower ones to see if it also secures the tube - there are not always two lots of nuts and washers. If the shield and the tube's mounting band are held by the same nuts, care must be taken to support the tube when the shield is removed, i.e. when the nuts fixing the shield have been removed there may be no further tube fixing, so that the tube will be loose. It's far safer to lay the receiver face down on a soft surface and support the chassis on a stool or box rather than work on a bench. By doing it this way, the tubes can be lifted in and out vertically with less risk of strain. Support the cabinet so that the face of the tube protrudes without touching the surface.
Note also that there is additional earthing between the tube's mounting band and the degaussing shield, via a high - value resistor. Make sure that this resistor is fitted with the new tube, and that it's not open -circuit. Poor earthing accounts for the sometimes strange effects encountered when a new tube has been fitted - instead of the results you hoped for, you may get variations in picture size and general fluctuation etc.
Fitting the New Tube Having stripped any earthing clips and braiding from the old tube, fit these to the new one in the same positions. Present the new tube to the cabinet, ensuring that the e.h.t. connection is in the same position as before, generally at the top but sometimes at the bottom (particularly with Thorn sets). The method of fixing the tube's lugs to the cabinet varies from set to set. When the tube and shield have been firmly fitted and the earthing leads have been correctly connected, the scan coils and the convergence assembly can be slid on to the tube's neck and provisionally clamped, observing the note you made of their original positions.
Next fit the purity magnets if these are separate from the convergence assembly, then the blue lateral magnet clamp, the tube base and the e.h.t. connector (once the chassis has been replaced to enable this to be done). Run through the plug and socket connections to ensure that none have been forgotten, and resolder or otherwise reconnect the earthing leads from the degaussing shield and the tube's outer coating to the base panel.
Reconnect the degaussing coils, and when you've done all this double check everything again. It's all too easy to overlook a disconnected lead or plug, and the extra trouble taken at this stage can save a lot of heartache later on. Purity and Convergence When you switch the set on, the images displayed on the screen may appear a trifle strange. First switch off the blue and green guns to leave what should be a red only display.
If it's pure red you're in luck and the other guns can be switched on again and the convergence carried out. If the red raster is impure, i.e. other colours are present with the blue and green guns switched off, you will have to carry out the purity procedure first. Slacken the wing nuts securing the scan coils and slide the assembly back. Then adjust the purity magnets to obtain a large area of red in the centre of the screen, rotating the rings relative to each other until the central area is free from anything other than red. If difficulty is experienced, degauss the tube manually. When you've got a good central red area, slide the scan coils forward to spread the red area out to the edges of the screen. Some fine adjustment of both the rings and the coils may be necessary. Switch off the red gun and switch on the other two guns in turn to ensure that the blue and green rasters are pure. Due to their high internal vacuum, tubes are dangerous and should be handled with care. The drawings RIGHT show recommended methods, when lifting the tube from the edge -down position (top), when lifting the tube face up (right) and when lifting it face -down (bottom). Under no circu
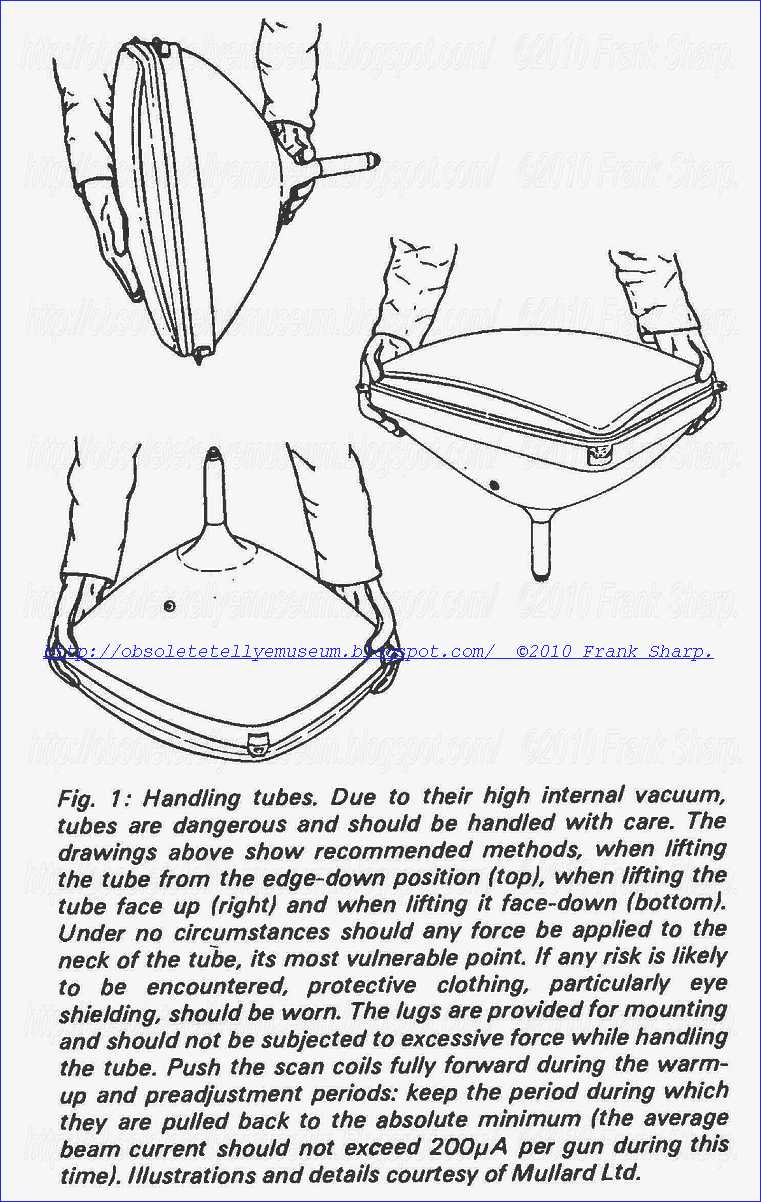 mstances should any force be applied to the neck of the tube, its most vulnerable point. If any risk is likely to be encountered, protective clothing, particularly eye shielding, should be worn. The lugs are provided for mounting and should not be subjected to excessive force while handling the tube. Push the scan coils fully forward during the warm- up and preadjustment periods: keep the period during which they are pulled back to the absolute minimum (the average beam current should not exceed 200pA per gun during this time). (Illustrations and details courtesy of MuHard Ltd). Having obtained acceptable purity, one must face the fact that doing this will have had a profound effect on the convergence, so that it will be necessary to go throughthe convergence procedure. Again we must stress that these notes apply only to delta -gun tubes. In a delta -gun tube the blue gun occupies a central position at the top or bottom depending on which way up the tube is fitted, the red and green guns being angled to the sides. The static convergence magnets occupy corresponding positions, and are used to move the beam positions accordingly, i.e. blue up and down and the other two diagonally. The idea is to converge the red and green images first, then move the blue one to marry up, using the blue static magnet for vertical movement of the blue display and the blue lateral magnet at the rear of the tube to obtain horizontal registration. This gets things right at the centre of the screen. Some adjustment will also have to be made to the dynamic convergence controls on the convergence panel.
Since the old tube will probably have been set up to obtain a reasonable grey scale with guns whose emission differed, the even emission of the guns in the new tube will probably mean that the c.r.t. first anode controls need adjustment. You'll usually find them on the convergence panel, occasionally elsewhere. Adjust them for nice mid and dark greys (no colour), with the video drives set to obtain light greys and white. Once a happy balance has been achieved, turn up the colour or tune it in. The aim is to get good flesh tones - good colour cannot be achieved unless the grey scale has first been set for a good black -grey -white picture.
It must in fairness be pointed out that the foregoing is an over -simplified account of tube changing. It has to be, since each different model requires a different drill. If the appropriate manual gives the required information, this should be followed. In the absence of such information, a preliminary examination will generally show what the snags are and whether the construction is such that the main panel or chassis can be removed in one piece to expose the tube.
Lots of other sets call for dexterity and industry, so that all in all tube replacement is not a job that should be undertaken lightly just because doing it the first couple of times presented few problems.
Remember that PIL tubes have the scan coils etc. permanently fixed, so that the replacement will come with the coils and magnets already fitted and aligned. This is another reason for having the new tube to hand before removing the old one - so that you know what you're dealing with.
SUPER
ReplyDelete